

What is Vermicomposting?
Vermicomposting, commonly called worm composting, is often a preferred method of composting for growers and homeowners operating in small-scale settings. This process relies on earthworms and microorganisms to break down organic materials, transforming them into a nutrient-rich soil amendment called vermicompost or worm castings. Worm castings and vermicompost can be used in both landscape and farm settings to improve soil nutrient content, as they contain around 4% more nitrogen than traditional microbial compost.
Related Content
In addition, vermicompost can improve soil tilth, enhance water-holding capacity, and reduce erosion in both landscape and farm systems. Several studies have shown that using vermicompost as a soil amendment can enhance soil biodiversity by promoting beneficial microbes. These microbes support plant growth directly by producing growth-regulating hormones and enzymes and indirectly by suppressing plant pathogens, nematodes, and other pests.
Vermicomposting directly supports plant growth and improves overall soil health, while also helping reduce organic waste, such as fruit and vegetable scraps that might otherwise end up in landfills. According to the U.S. Environmental Protection Agency (EPA), food waste makes up about 24% of municipal solid waste disposed of in landfills (EPA, 2025). When these materials decompose in large piles without access to oxygen, a process known as anaerobic decomposition occurs, generating methane, a combustible greenhouse gas that significantly impacts the environment.
Vermicomposting has been said to reduce methane emissions by 22%–26% compared to thermophilic composting (hot composting that relies on heat-loving bacteria) by 32% at higher moisture, 16% at lower moisture, and by 10%–35% with increased earthworm density (Nigussie et al., 2016).
Setting up a vermicomposting bin system can help reduce the amount of yard and farm waste sent to landfills while producing worm castings, or vermicompost, as a valuable byproduct that can be used directly during production. Vermicomposting typically requires less regular turning or aerating than traditional composting methods. This process also requires significantly less space and can be easily set up for small-scale use while also being scalable for larger operations, including commercial applications (Table 1).
| Comparison category | Vermicomposting | Traditional composting (microbial composting) |
|---|---|---|
| Primary decomposers | Earthworms (e.g., red wigglers) and associated microbes | Microorganisms (bacteria and fungi) |
| Space requirement | Space-efficient; suitable for small or indoor systems | Requires larger outdoor space or compost piles |
| Processing time | Generally faster (under optimal conditions) | Moderate; dependent on turning and temperature management |
| Aeration | Minimal turning; worms naturally aerate material | Requires regular turning or mechanical aeration |
| Temperature | Mesophilic (moderate temperatures, about 55–77 °F) | Thermophilic phase can reach 130–160 °F |
| Nutrient content | Produces nutrient-dense vermicompost; often higher in available nitrogen and microbial activity | Produces stable compost with balanced nutrient content |
| Odor | Low odor when properly managed | Can produce odors if not properly aerated |
| Management and maintenance | Requires maintaining moisture and worm health | Requires monitoring carbon: nitrogen ratio, moisture, and temperature |
| Waste diversion | Effective for food scraps and small-scale organic waste | Suitable for yard waste, crop residues, and larger organic volumes |
| Scalability | Home, classroom, community, and commercial systems | Backyard, municipal, and commercial-scale operations |
Breaking It Down: Vermicomposting Decomposition
Vermicomposting is like traditional (microbial) composting in that both processes break down organic materials into a stabilized form of organic matter that can be used as a soil amendment or natural, non-synthetic fertilizer. Both composting methods require oxygen to complete the process (also referred to as aerobic decomposition). However, while microbial composting relies primarily on fungi, bacteria, and other microorganisms to drive decomposition, vermicomposting depends on the activity of the earthworms. The red wiggler species (Eisenia fetida) is the most used vermicomposting worm that can consume its body weight in organic matter daily, reproducing every 7 to 10 days under optimal conditions (Edwards et al., 2010).
Other species have been used traditionally in this process and include blue worms (Perionyx excavatus), African nightcrawlers (Eudrilus eugeniae), and red tiger worms (Eisenia andrei). These species feed primarily on leaf litter and other decaying organic matter. These vermicomposting species (red wigglers, blue worms, African nightcrawlers, red tiger worms, and others) are available through a variety of sources. Many online worm farms, garden supply retailers, and local bait shops sell composting worms.
In addition to online suppliers, local and regional sources, such as bait shops, community gardens, small-scale worm growers, and composting groups may offer worms for sale or exchange. County Extension offices may also know of community-based growers or regional producers.
Searching online for terms like “vermicomposting worms,” “local red wigglers,” or “composting worms for sale near me” will provide multiple supplier options. Availability may vary by season and region. While aerating or turning the pile is essential in microbial composting, worms in a vermicomposting system naturally aerate the material as they feed and move through the pile.
Vermicomposting Requirements
In traditional microbial composting, also known as hot composting, it is critical to maintain pile temperatures between 131–160 °F (55–71 °C) during the rapid decomposition phase. In contrast, vermicomposting requires cooler conditions, with temperatures between 55–77 °F to keep worms active and healthy (Table 2). If temperatures rise above this range, worms will seek an escape to avoid the excessive heat. If temperatures fall below 55 °F, composting worms can survive as long as the center of the vermicompost bin or pile remains above freezing.
| Method | Active phase (temperature) | Moisture content | C: N ratio | pH level |
| Vermicomposting | Ambient temperatures (55–77 °F) | 70%–85% | ~50:1 | 7 (neutral) |
Traditional composting methods, such as piles or tumblers, can reach and maintain temperatures above 130 °F, which is typically sufficient to sterilize most seeds or pathogens. In contrast, the cooler temperatures needed for worms’ survival are not high enough to neutralize seeds, plant diseases, or soilborne pathogens.
Moisture also plays a critical role in vermicomposting, as maintaining proper levels keeps worms healthy and active while supporting microbial activity in the bin. The optimal moisture content for worm growth is between 70%–85% (Table 2). Excess moisture can create anaerobic conditions that hinder both microbial and earthworm activity, while too little moisture in a vermicompost bin can cause worms to desiccate.
Organic wastes high in nitrogen (N) such as grass clippings, coffee grounds, and fruit and vegetable scraps (often referred to as “greens” in traditional composting) can be fed to worms. However, vermicomposting requires a higher carbon-to-nitrogen (C:N) ratio than traditional microbial composting. Eisenia fetida can consume a wide range of organic matter and thrive at C:N ratios around 50:1, whereas traditional composting typically requires a ratio of 25:1–30:1. To achieve this higher carbon content, increased amounts of “brown” materials such as straw, leaf litter, cardboard, or paper can be added to produce a worm bedding and to achieve the higher C:N ratio required.
Alkalinity and acidity should be monitored to maintain proper pH levels for Eisenia fetida. A neutral pH (around 7) is ideal, while pH levels below 5 can encourage microbial growth in the vermicompost bin and negatively impact earthworm activity and reproduction (Table 2).
Bin There, Composted That: Vermicomposting Bin Selection and Considerations
Vermicompost bins are commercially available and can be purchased directly or constructed using wood or plastic storage containers. It is imperative to think through and consider the following questions prior to bin selection and establishing a site location:
- How much space do I have available, and where will I place the vermicompost bin (indoors, garage, balcony, or outdoors)?
- Will the bin be placed where temperatures stay within the ideal range (55–77 °F)?
- How much food or organic waste do I generate weekly?
- What bin size or capacity will best match my waste volume?
- Do I want a system designed to collect worm leachate (liquid that drains naturally from a vermicomposting bin)? What is my budget for setup and ongoing management?
- Am I composting for reducing food waste, improving soil conditions, or producing worm castings and worms for sale or use?
Plastic tubs, barrels, buckets, or storage containers can serve as low-cost options for vermicomposting bins (Figure 1).
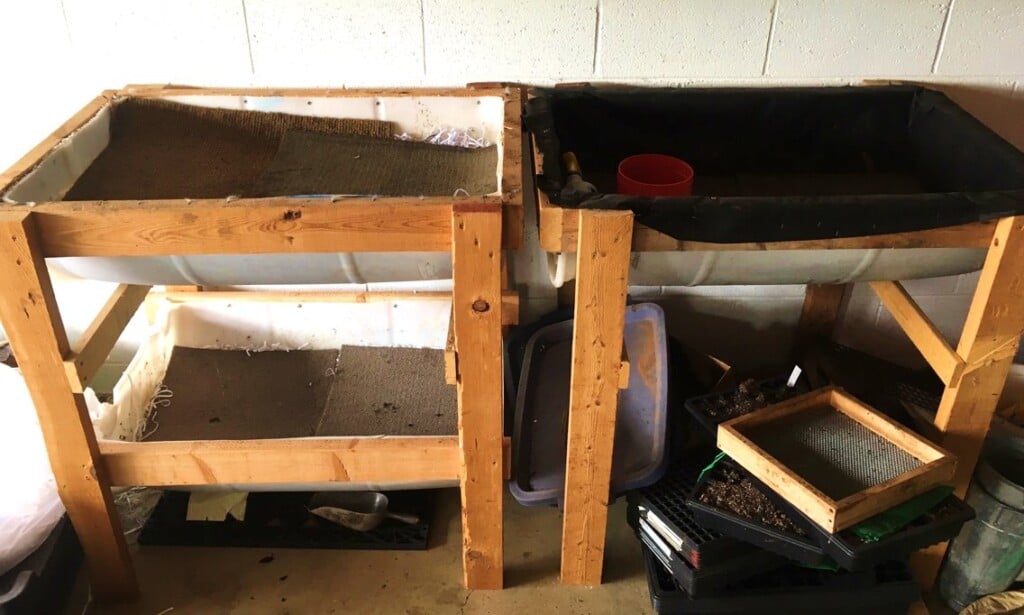
Photo: Josh Fuder.
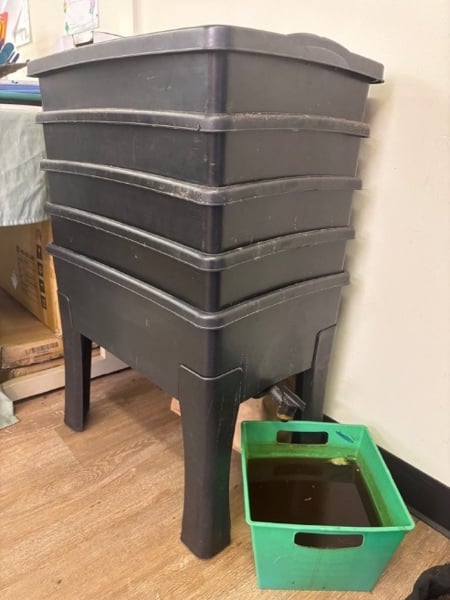
Another option is a stacked tray system, which is elevated on legs and provides a convenient way to manage and harvest compost. These systems have holes in the bottoms of each tray, allowing worms to migrate in search of food while leaving their castings behind for easy and continuous harvesting (Figure 2).
Flow-through bins are another design in which organic materials such as vegetable scraps are added at the top and worm castings are collected from the bottom through a screened opening. These bins are typically larger and are most often used in outdoor vermicomposting operations. A key consideration is that multiple vermicompost bins will be needed, like with traditional composting, to keep the vermicomposting process continuous, handle larger amounts of food waste efficiently, and accommodate the expanding worm population in your starter bin.
When selecting or preparing a bin, it is important to choose a dark-colored container with a secure lid to keep out pests while blocking excess light and rain. Adequate ventilation is also essential, so be sure to drill air holes or ensure the system allows for proper airflow to maintain a healthy environment for the worms. To achieve the suggested ventilation rate, drill 20 holes with a diameter of 1/4 in. per square foot. Because excess liquid often accumulates in vermicomposting bins, it is also important to provide drainage either by drilling holes or using a built-in spigot when selecting an appropriate system.
Consider where you will place the vermicomposting bin and whether it will remain indoors year-round or need to be moved indoors or outdoors with the changing seasons. If placing a bin outdoors, choose a shady location to help maintain moisture and prevent the system from drying out over time.
The size of the bin should be selected based on the amount of waste your operation will produce. A general guideline is to provide 1 ft2 of surface area for every pound of weekly organic waste. If you produce 5 lb of yard or produce scraps weekly, a bin that is 5 ft long, 1 ft wide, and 8–20 in. deep is recommended.
Vermicomposting Bin Considerations
- Air holes to maintain airflow: Maintain aerobic conditions for Eisenia fetida; should be small to keep out unwanted flies (1/4- to 1/2-in. diameter holes and 8–12 holes per bin recommended)
- Lid required: Vermicomposting lid needed to prevent light, rain, and pests from entering
- Container or Bin Size: 1 square foot of surface area per pound of weekly organic waste
When setting up a vermicomposting system, bin design is important for long-term success. Composting worms naturally live and feed near the surface of organic material rather than deep in the bin. For this reason, a shallow bin with a larger surface area works better than a deep container. Greater surface area allows worms easier access to food scraps and supports efficient decomposition.
Getting Started and Preparing a Vermicompost Bin System
Once you have selected an appropriate bin for your operation, the next step is to prepare the bedding. This can be done by cutting traditional black-and-white newspaper into 1/2- to 1-in. strips and soaking them in water until they feel like a damp sponge. Fill the bin about three-quarters full of the moistened newspaper, making sure the bedding is loose enough to provide adequate airflow. If newspaper bedding is unavailable, coconut coir blocks serve as an effective alternative and should be soaked thoroughly before being added to the bin. To introduce beneficial microorganisms into the bin, 2–4 cups of native soil or finished compost can be added to the bin. The soil’s gritty texture also aids in the worms’ digestive process.
The next step is to add your composting worms (Eisenia fetida) to the bin. It’s important to know how many worms you’re introducing, as this will determine how much feedstock should be added each week. One of the easiest methods is to weigh the worms to determine the volume you are adding. If purchasing worms commercially, they are often sold by weight or number, making it easier to determine the amount being added for your system.
Once the initial bedding and worms have been added to the bin, fruit and vegetable scraps should be buried beneath the bedding layer. It’s important to cut these scraps into small pieces to promote faster digestion and decomposition (Figure 3). As a general guideline, worms should be fed approximately three times their body weight per week.
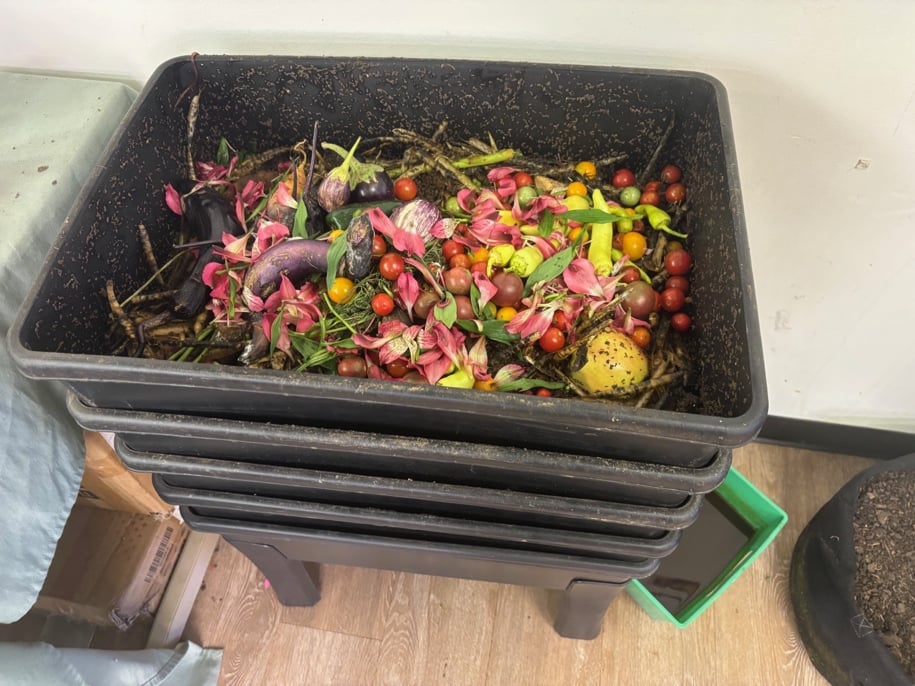
Photo: Josh Fuder.
For example, if you start with 1 lb of worms, you should add about 3 lb of organic material each week. Be sure to monitor the bin regularly to ensure the worms are consuming the food and adjust feeding amounts as necessary to prevent overfeeding. Using a small kitchen scale can help you feed your worms more efficiently, allowing you to follow the recommended ratio of about 1 lb of worms to 3 lb of food scraps. Digital kitchen scales suitable for vermicomposting can be found at big-box and home improvement retailers, through online outlets, and at many kitchen supply or garden supply stores.
Overfeeding a vermicompost bin can cause uneaten food to decompose anaerobically, leading to foul odors, excess moisture, mold growth, and pest issues. In severe cases, overfeeding can create conditions that stress or even kill the worms. On the other hand, underfeeding worms can slow their growth and reproduction.
When adding new food scraps to the bin, lift the bedding layer, place the scraps underneath, and ensure they are fully covered with bedding before closing the container. Coffee grounds and filters, vegetables and fruit peels and scraps, bread, and grains can be added to the vermicompost bin as feedstock. However, meat and dairy products, greasy foods, bones, pet waste, and woody twigs should be avoided, as they can cause odor issues, attract pests, or are too difficult for worms to break down (see callout box).
Feedstock Do’s and Don’ts
- Feedstock do’s: coffee grounds and filters, vegetable and fruit peels and scraps, tea bags and tea leaves, breads and grains
- Feedstock don’ts: greasy food, meat and dairy products, pet waste, bones, twigs
When starting a bin, a dry sheet of newspaper can be placed over the bedding to help maintain moisture levels, deter unwanted pests, and reduce odors. Other carbon-rich, breathable materials can serve the same purpose, including corrugated cardboard, shredded office paper, uncoated paper bags, dried leaves, and coconut coir mats. These materials create a light, absorbent barrier that moderates humidity, improves airflow, and reduces the likelihood of fruit flies or fungus gnats; these conditions are supported by research on bedding composition and pest management in vermiculture systems (Edwards et al., 2010).
Routine maintenance of the bin includes feeding the worms weekly and misting with water if moisture levels drop. A hand-held moisture meter can be used to assess compost moisture levels, and most options range from $200–$400 depending on the unit’s features and versatility. If the bedding becomes too wet, dry materials such as shredded newspaper or coconut coir can be added to absorb excess moisture. Additional bedding materials that may be added include corrugated cardboard, peat moss, leaves, and dry straw. Fluffing the bedding once a week also helps maintain adequate airflow within the bin, creating a healthier environment for the worms. This is a similar process to turning in traditional composting.
Steps of Vermicomposting
1. Prepare Bedding
- Shred newspaper, cardboard, or use coco coir
- Moisten bedding to damp, not soggy
- Ensure drainage (make holes for excess moisture)
- Ensure airflow (create ventilation holes)
2. Add Worms
- Add composting worms (e.g., red wigglers)
3. Feed the Worms
- Add food scraps (vegetables, fruit peels)
- Bury food 2–3 in. under bedding
- Feed in moderation (small handfuls, two to three times per week)
- Avoid meat, dairy, oily foods, and citrus
4. Maintain the Bin
- Keep moist, not soggy; add damp bedding if needed
- Keep bin temperature between 55–77 °F; room temperature is ideal
- Check weekly: Look for fruit files, odors, or too-dry/wet bedding
5. Harvest Compost
- Collect finished vermicompost every 2–6 months
- Separate worms from compost (harvest)
- Harvest methods: light exposure, migration, or screen sorting
6. Use the Compost
- Enrich garden soil (use as a mulch or soil amendment)
- Fertilize houseplants (mix with potting soil or make compost tea)
Simple Ways to Monitor Moisture in Vermicomposting Systems
Moisture management is crucial for successful vermicomposting, and several simple, low-cost methods can be used to assess the moisture levels of bedding and vermicompost. The most common approach is the squeeze test or fist test, in which a handful of bedding or vermicompost is squeezed firmly in the hand. If one to two drops of water are released, moisture levels are considered ideal (70%–80%). If no water is released and the material falls apart, the system is too dry, while water streaming from the material indicates excessive moisture. This method is widely used for routine moisture monitoring (Edwards & Arancon, 2022; Gurusamy et al., 2021).
Additional tools can provide more consistent measurements. Analog soil moisture meters are battery-free, dial-type meters that measure electrical conductivity in soil associated with moisture. They typically cost $8–$15, making them an affordable option for assessing moisture deeper within the bin. They are useful for identifying overly wet or dry zones within vermicomposting systems (Sherman, 2018; Myers, 2013).
Low-cost digital hygrometers ($10–$20) can also be placed inside the bin (protected within a mesh or cloth bag) to monitor ambient humidity, which often correlates with bedding moisture. Hygrometers are particularly helpful for diagnosing condensation, airflow limitations, and moisture issues in closed-lid plastic bins (Szyłak-Szydłowski & Kos, 2024; Stipniece et al., 2022; see Table 3).
For greater precision, a gravimetric moisture check can be used. This method involves weighing a wet sample of vermicompost, drying it completely (using sunlight or a low-temperature oven), and weighing it again. Moisture content is calculated as: (wet weight − dry weight) ÷ wet weight × 100. This technique is the standard laboratory method for moisture measurement and is useful for research applications, troubleshooting persistent moisture problems, or calibrating other monitoring tools (ASTM International, 2019; Brewer et al., 2024; Natural Resources Conservation Service, 2010).
Finally, visual and biological indicators provide valuable everyday feedback on moisture conditions. Earthworm behavior and the presence of other organisms can signal imbalances. These techniques are especially valuable for beginners experiencing management challenges such as strong odors, pest-related issues, and learning to manage moisture. They are also helpful for educators working with small vermicompost classroom systems.
Excessive moisture is often associated with strong ammonia or sour odors, increased populations of mites or springtails, and worms climbing the sides of the bin or attempting to escape. Dry conditions, in contrast, are indicated by dusty or brittle bedding and worms clustering deeper within the system. These biological cues are reliable, practical indicators of moisture status in active vermicomposting systems (Appelhof, 1997; Domínguez & Edwards, 2010).
| Method | How it works | What it indicates | Cost and use case |
| Squeeze test | A handful of bedding or vermicompost is squeezed firmly by hand | 1–2 drops of water = ideal moisture (≈70%–80%); no drops and material crumbles = too dry; water streaming out = too wet | Free; reliable for routine monitoring in research and Extension settings |
| Analog soil moisture meter | A dial-type probe is inserted into the bedding to estimate moisture based on electrical conductivity | Identifies overly wet or dry zones deeper within the bin | $8–$15; affordable, easy to use, no batteries required |
| Digital hygrometer | A small digital sensor placed inside the bin measures ambient humidity | Help diagnose moisture trends, condensation, and airflow issues, especially in closed-lid bins | $10–$20; useful for troubleshooting enclosed systems |
| Gravimetric moisture check | A sample is weighed wet, dried completely, and reweighed; moisture is calculated as (wet − dry) ÷ wet × 100 | Provides precise moisture percentage | Low cost; standard laboratory method for research, calibration, or troubleshooting |
| Visual and behavioral indicators | Observing worms, odors, and bedding condition | Excess moisture: ammonia/sour odors, mites, worms escaping; dry conditions: dusty bedding, worms clustering deep in bin | Free; practical for daily monitoring |
| Note. Information in this table was compiled from Edwards & Aroncon, 2022; Sherman, 2018; ASTM International, 2019; Myers, 2013; Szyłak-Szydłowski & Kos, 2024; Gurusamy et al., 2021; and Appelhof, 1997. | |||
Recommendations for Moisture Monitoring for Home and Small Farm Use
For most bins, use the free squeeze test and inexpensive analog moisture meter for reliable, simple moisture monitoring. These methods provide enough accuracy to maintain worm health and optimal composting conditions without costly equipment.
Harvesting and Using Finished Worm Castings or Vermicompost
Composting worms break down organic materials into dark, nutrient-rich castings within 2 to 5 months. To harvest the vermicompost, the contents of the bin can be emptied into small piles on a white sheet under sunlight. Since worms naturally avoid light, they will burrow downward, allowing the upper layers of castings to be collected (Figure 5).
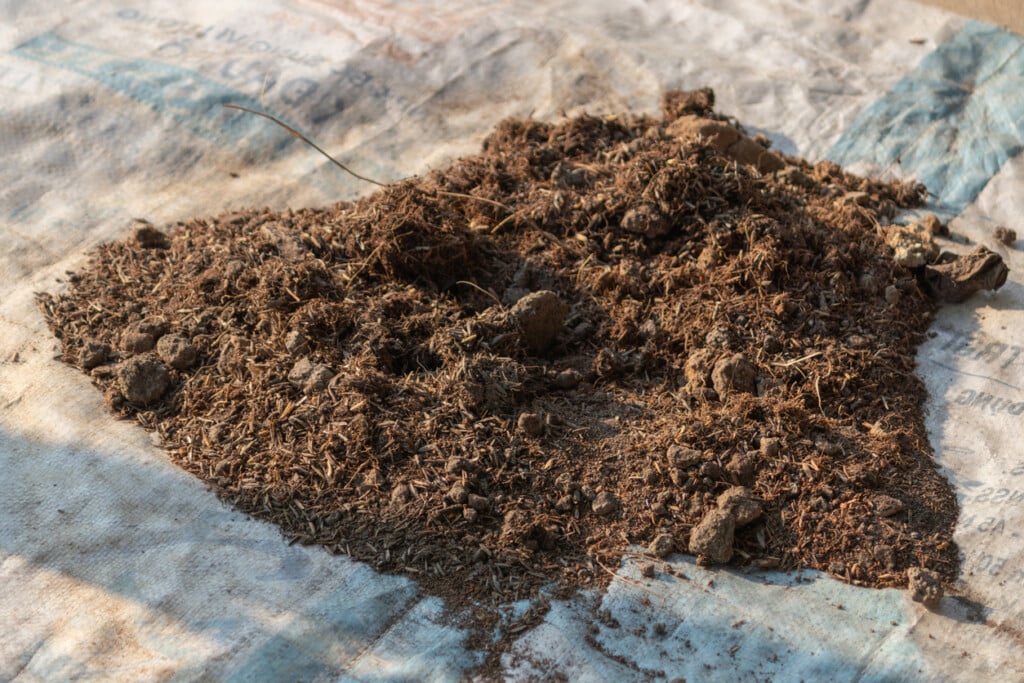
There are several other vermicomposting harvesting methods, including the sifting and worm migration methods. Through the sifting method, vermicompost is sifted through two different-sized screens, one of which is to remove chunky materials that have yet to fully break down (and larger worms). The second screen is to separate smaller worms and smaller remaining vermicompost fragments. Some producers even incorporate a third screen size to sift into a smaller particle size and to remove worm egg cases so they can be returned to new bins and maintain worm populations.
Options for compost or soil sifters or sieves that fit perfectly over a 5-gallon bucket are commercially available and work well for this purpose. For larger operations, a variety of mechanical sifting machines are used, including trommels, which allow worm producers to dump their system into the machine and let it mechanically separate castings from worms and other composting debris.
Another effective harvesting technique involves encouraging worm migration within the bin. Feeding is stopped for 1 to 2 weeks, and then all contents of the bin are moved to one side. Fresh bedding is placed on the empty side along with food scraps. Within 1 to 2 weeks, the worms migrate to the new food source, allowing the finished vermicompost on the opposite side to be removed with minimal worms present. New bedding can then be added to the emptied side to restart and refresh the system.
Some worm farmers also use mesh bags filled with food placed inside the bin. Worms migrate into the mesh bag to feed, and when the bag is removed, most of the worms are removed with it, making the separation process easier.
Using Vermicompost Directly in Soil
These castings can be used immediately or stored to be used later (Figure 6). On average, well-rotted vermicompost contains between 1.2%–4% nitrogen, 0.9%–1.7% phosphorus, and 1.5%–2.5% potassium, with a typical carbon-to-nitrogen (C:N) ratio of less than 15:1 (Rynk et al., 2022).
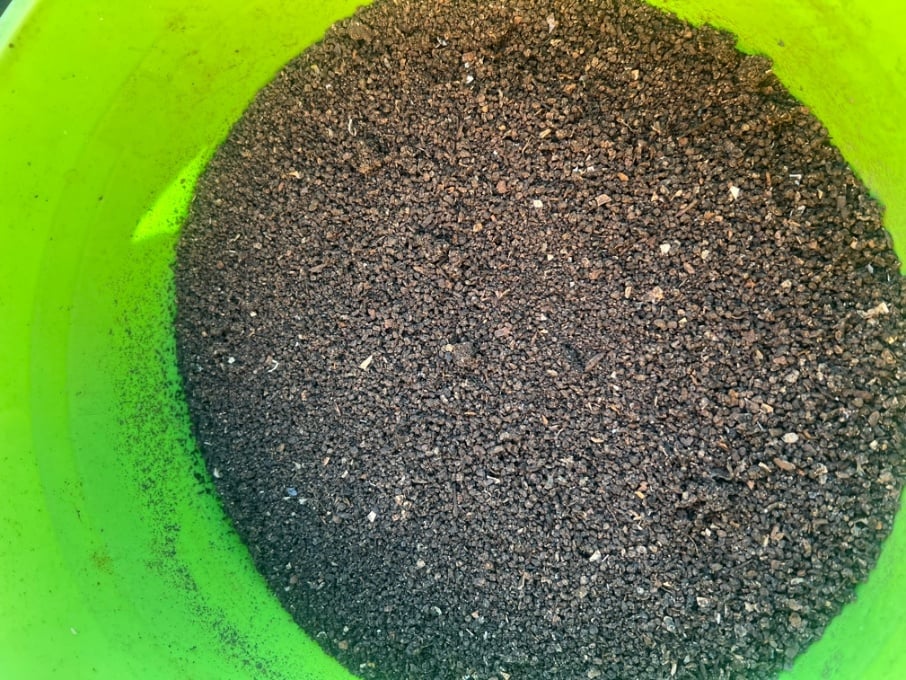
Photo: Bethany Harris.
Vermicompost can be used as a soil amendment, for topdressing, or as an additive in potting mixes for ornamental and vegetable crops. The callout box below provides recommended application rates for both soil and soilless media incorporation and topdressing (Hamilton, 2017). When using vermicompost in vegetable production, it should be applied at least 90 days before harvesting crops whose edible parts do not touch the soil. For crops where the edible parts do touch the soil, application should occur at least 120 days before harvest (Agricultural Marketing Service, 2006).
Vermicompost Application Recommendations
- Garden soil amendment: 1/2 to 1 in. layered and tilled into the top 4–6 in. of soil.
- Potting soil amendment: One-fifth to a quarter vermicompost by volume.
- Topdressing application: Add castings around the base of plants, ensuring the castings do not make direct contact with plant tissue.
- Vermicompost tea application: Follow brewing process above; 50 ml of vermicompost tea solution should be applied as a soil drench biweekly during active plant growth (Javanmardi et al., 2024).
Using Vermicompost to Make Tea
In addition to using worm castings as a soil amendment, vermicompost tea is a liquid solution made by steeping vermicompost or worm castings in water. The brewing process involves adding a defined quantity of vermicompost to water at a specific ratio (typically 1:3 to 1:10 water to vermicompost), followed by continuous aeration for 72 hr of brew time at room temperature (Javanmardi et al., 2023).
The tea can be applied directly to the soil at the base of plants as a soil drench (see callout box above), where it can be taken up directly or applied as a foliar spray. Vermicompost tea contains a rich and diverse population of beneficial microorganisms, including bacteria, fungi, protozoa, and nematodes (Organic Land Care Program, n.d.). It also provides readily available nutrients that plants can absorb and utilize efficiently.
Several studies have shown that applying vermicompost tea can significantly enhance plant growth, improve soil microbial activity, and increase resistance to certain plant diseases (Yin et al., 2025).
What Is Worm Tea?
Worm tea is a liquid extract made by soaking high-quality worm castings in water to draw out beneficial nutrients and microorganisms. It is used as a natural, gentle, and fast-acting fertilizer for plants.
How to Make and Use Worm Tea
Aerated method to “brew” the tea:
- Place 1 cup of high-quality worm castings in a mesh bag or cheesecloth.
- Fill a clean 5-gallon bucket with dechlorinated water (let tap water sit for 24 hr or use rainwater).
- Suspend the casting-filled bag in the water.
- Add 1–2 tablespoons of unsulfured molasses to feed beneficial microbes (optional but common).
- Use an aquarium air pump with an air stone to aerate continuously for 12–24 hr.
- When brewed, the tea should smell earthy and pleasant—not sour or rotten.
- Use immediately for best results.
Application:
- Dilute 1:1 with water.
- Apply as a soil drench around the base of plants.
- If using as a foliar spray, strain thoroughly through a fine mesh to avoid clogging sprayers.
How Does Worm Tea Compare to Leachate or Compost Tea?
Different types of vermicompost by-products provide different benefits to the soil.
Worm Tea
- brewed intentionally from worm castings and water
- aerated to promote beneficial microbes
- safe and widely used as a nutrient boost and microbial inoculant
- earthy smell; safe for soil and plant applications
Leachate
- liquid that drains naturally from a worm bin
- often contains anaerobic bacteria, which may be harmful
- can contain pathogens depending on feedstock and conditions
- not recommended for foliar use and should be used cautiously
Compost Tea
- similar process but made from thermophilic compost instead of worm castings
- may include additives (kelp, molasses, humic acids)
- can have higher microbial diversity
- more variable quality depending on brewing practices and compost source
Key Takeaway: Worm Tea
Worm tea is brewed from castings, leachate comes straight from the bin, and compost tea comes from hot compost. Only worm tea and compost tea should be intentionally brewed and applied.
Table 4 summarizes how to use vermicompost.
| Application method | Rate/ratio | Implementation | Tools/implements |
| Garden soil amendment | 1/2–1 in. | Incorporate into top 4–6 in. of soil | Hand tiller, garden fork, cultivator; stirrup hoe; manual rototiller; walk-behind tiller |
| Potting soil amendment | 20%–25% vermicompost by volume | Mix evenly with potting media | Hand trowel, mixing tub, potting bench tools |
| Topdressing | Thin ring around plant base | Keep vermicompost from contacting stems or foliage | Hand rake, gloved hands |
| Vermicompost tea (soil drench) | 50 ml per plant biweekly during active growth | Apply to soil at plant base |
Worm Bin Woes: Common Issues and Troubleshooting
An established worm bin can be maintained for many years with minimal issues. However, it’s important to be aware of common challenges and know how to troubleshoot them effectively.
| Issue | Challenge | Troubleshooting |
| Unpleasant odor | Overfeeding worms; inadequate air flow | Stop feeding for a week and fluff material to encourage air flow |
| Unwanted pests | Flies and other insects attracted to bin | Cover exposed food with bedding and stop feeding for a week; ensure ventilation holes are small |
| Undesirable mold forming in bin | Bin has become too acidic | Remove citrus peels and fluff bedding; avoid adding citrus and other acidic food scraps |
| Excess water from bottom of the bin | Bin has become too wet | Ensure adequate drainage of the bin; add dry bedding to help dry out the bin |
| Escaping worms | Bin has become too hot, dry, or wet; inadequate amount of bedding | Move bin to a cool or shaded area; spray bin to add moisture and fluff; add dry bedding; increase bedding quantity |
Conclusions
Vermicomposting can be an effective, sustainable way to manage organic waste while producing a high-quality soil amendment that benefits both plant and soil health. Whether used in home gardens, landscapes, or on farms, this method is space-efficient and can be scaled to the operation. By understanding the basics of worm biology, bin setup, and system maintenance, growers can successfully implement vermicomposting to enrich their soil, reduce landfill contributions, and support long-term sustainability.
With proper establishment and management, a vermicomposting system can provide a multitude of agricultural and environmental benefits for years to come. For more information about setting up a vermicomposting system, please contact your local Extension office online or by phone (1-800-ASK-UGA-1).
References
Agricultural Marketing Service. (2006). National organic standards board crops committee recommendation for guidance; use of compost, vermicompost, processed manure, and compost teas. U.S. Department of Agriculture. https://www.ams.usda.gov/sites/default/files/media/NOP%20Final%20Rec%20Guidance%20use%20of%20Compost.pdf
Appelhof, M. (1997). Worms eat my garbage. Flower Press. https://books.google.com/books/about/Worms_Eat_My_Garbage.html?id=5r0QPwAACAAJ
ASTM International. (2019, March 19). Standard test methods for laboratory determination of water (moisture) content of soil and rock by mass (ASTM D226-10). https://doi.org/10.1520/D2216-10
Brewer, L. J., Andrews, N., Sullivan, D. M., & Gehr, W. (2024). Agricultural composting and water quality (Publication No. EM 9053). Oregon State University Extension Service. https://extension.oregonstate.edu/catalog/em-9053-agricultural-composting-water-quality
Domínguez, J., Aira, M., Kolbe, R., Gómez-Brandón, M., & Pérez-Losada, M. (2019). Changes in the composition and function of bacterial communities during vermicomposting may explain beneficial properties of vermicompost. Scientific Reports, 9, 9657. https://doi.org/10.1038/s41598-019-46018-w
Domínguez, J., & Edwards, C. A. (2010). Biology and ecology of earthworm species used for vermicomposting. In C. A. Edwards, N. Q. Arancon, & R. L. Sherman (Eds.), Vermiculture Technology (1st ed., pp. 28–38). CRC Press. https://doi.org/10.1201/B10453-8
Edwards, C. A., & Arancon, N. Q. (2022). Biology and ecology of earthworms (4th ed.). Springer. https://doi.org/10.1007/978-0-387-74943-3
Gurusamy, N. N., Puffer, N., de Jongh, C., Gil, C. R., & Aspray, T. J. (2021). Effect of initial moisture content and sample storage duration on compost stability using the ORG0020 dynamic respiration test. Waste Management, 125, 215–219. https://doi.org/10.1016/j.wasman.2021.02.048
Hamilton, D. W. (2017). The basics of vermicomposting (Publication No. BAE-1528). Oklahoma State University Extension. https://extension.okstate.edu/fact-sheets/the-basics-of-vermicomposting
Javanmardi, J., Santos, M. L. D., Manter, D. K., & Vivanco, J. M. (2023). Worm compost tea’s plant growth-promoting power: is it the microorganisms or chemical properties? Journal of Plant Nutrition, 47(4), 583–594. https://doi.org/10.1080/01904167.2023.2280133
Myers, R. (2013). Vermicomposting: The basics (Publication No. IP454). National Center for Appropriate Technology, ATTRA Sustainable Agriculture. https://www.ncat.org/wp-content/uploads/2022/06/vermicomposting.pdf
Natural Resources Conservation Service. (2010). Composting. In National engineering handbook (Part 637, Chapter 2). U.S. Department of Agriculture. https://directives.nrcs.usda.gov//sites/default/files2/1720464003/Chapter%202%20-%20Composting.pdf
Nigussie, A., Kuyper, T. W., Bruun, S., & de Neergaard, A. (2016). Vermicomposting as a technology for reducing nitrogen losses and greenhouse gas emissions from small-scale composting. Journal of Cleaner Production, 139, 429–439. https://doi.org/10.1016/j.jclepro.2016.08.058
Organic Land Care Program. (n.d.) Compost and compost tea. Rutgers University, New Jersey Agricultural Experiment Station. https://organiclandcare.rutgers.edu/guides/compost-and-compost-tea/
Rynk, R., Black, G., Gilbert, J., Biala, J., Bonhotal, J., Schwarz, M., & Cooperband, L. (2022). The composting handbook. Compost Research and Education Foundation, Academic Press. https://compostfoundation.org/composting-handbook/
Sherman, R. (2018). Vermiculture technology for small farms. NC State Extension.
Stipniece, A. A., Vladinovskis, V., Daugulis, P., Zemite, M., Vitola, L., & Mezule, L. (2022). Advantages and challenges of composting reactors for household use: Smart reactor concept. Sustainability, 14(16), 10030. https://doi.org/10.3390/su141610030
Szyłak-Szydłowski, M., & Kos, W. (2024). Application of sensory methods to evaluate the effectiveness of solutions to reduce the exposure to odour nuisance and ammonia emissions from the compost heaps. Sensors, 24(13), 4200. https://www.mdpi.com/1424-8220/24/13/4200
U.S. Environmental Protection Agency. (2025). Approaches to composting. https://www.epa.gov/sustainable-management-food/approaches-composting
Yin, J., Wang, J., Zhao, L., Cui, Z., Yao, S., Li, G., & Yuan, J. (2025). Compost tea: preparation, utilization mechanisms, and agricultural applications potential – a comprehensive review. Environmental Technology & Innovation, 38, 104137. https://doi.org/10.1016/j.eti.2025.104137