
Do you want a landscape that is beautiful, saves you time, effort and money and uses less water? If you do, a water-wise landscape is for you. Water-wise landscapes are designed, organized, and maintained by practices that use water strategically and wisely. Follow the seven basic steps outlined in this guide to create a beautiful water-wise yard or home garden.
Step 1. Map It: Proper Planning and Design
Proper planning is a critical component to developing a new landscape or modifying your current one. It’s important to take a step back and analyze your current landscape elements, your site characteristics and how you want to use your property. You’ll need to develop a water-wise landscape master plan by creating a base map, evaluating existing characteristics of your landscape and water-use areas.
Grab some graph paper, pencils and tracing paper. Start by drafting a base map on graph paper. Try to approximate scale. Include your home and other buildings found on the property, existing trees and plants, and unusual features like large rocks.
Place the tracing paper over your base map. Label it site analysis. Use arrows to indicate direction of desirable views and areas you want to screen, drainage patterns on the property (including low spots and eroded areas, shaded areas), and direction of seasonal winds. Finally, identify areas around your home that receive a lot of sun and could easily dry out, such as southern and western parts of homes.

Feeling overwhelmed?
If you need help mapping your landscape, contact UGA Extension or a landscape professional.
Use another sheet of tracing paper to identify areas in your landscape where you will need to water. Split this map into the zones listed below. Keep in mind the sun, shade, wind, heat, use areas, and the physical characteristics of your property.
Frequent water application areas are small, highly visible, and highly maintained areas where plants are regularly watered when it hasn’t rained, such as a front entrance.
Occasional water application areas include established plants and require some watering when they show symptoms of stress, like turning a gray-green color or wilting.
Infrequent water application areas include areas where plants are watered by rainfall. Design your landscape with 60% or more area with infrequent water application.

Water-Use Planning Tips
- Ideally, not more than 10% of the landscape should be zoned for frequent water use, 30% or less for occasional water use, and 60% or more should be zoned for infrequent water use.
- Now you are ready to develop your water-wise master plan. Use the map layers to create a comprehensive master plan.
Now you are ready to use all the map layers to develop a comprehensive water-wise master plan. Still not sure and need help pulling it all together? Contact your local UGA Extension office or a landscape professional.
Things to keep in mind as you finalize your design:
- Use odd-number groupings of plants when possible. The planting will look more natural and attractive.
- Avoid rigid, formal, or geometric planting.
- Use bands of low-growing plants or ground covers to tie together and unify groups of taller shrubs.
Now you have created an initial master plan map of your garden or landscape, and have general ideas of plant shapes and uses within the garden. Before we finalize the design and begin planting, you need to learn a little more about your site.
Step 2. Getting the Dirt on Your Soil: Soil Analysis and Improvements
Soil is the foundation of your garden and critical to your landscape’s success. Good quality soil absorbs and holds water well, provides nutrients, allows for water flow, and encourages roots to grow deep when topsoil is dry. Increased root growth of plants will help lower irrigation needs.
Analyze It
Chemical characteristics: Take a sample of your soil to a local county Extension office for testing. You will receive a report with recommendations for lime and fertilizer application based on the analysis and soil pH.
Drainage: Dig a hole 12–15 in. deep. Fill the hole with water and see how fast it drains. If water is still in the hole after 12 hr, the soil is poorly drained. This may indicate a hardpan layer and may require additional steps to improve drainage, such as installing drain pipe.
Improve It
Turn over the first 6 in. of soil by spading or rototilling. This will break up compacted soil and allow plants to grow deeper roots.
Incorporate 3 in. of organic matter, such as compost, peat moss, or leaves, 12 in. into the soil of the entire bed area. This works out to be about one cubic yard of organic amendment applied over a 100-square-foot area. This will help keep water in the soil where the roots are.
Use the results of your Extension soil analysis to help identify appropriate soil amendments to add.
Soil Testing Tip
Individual landscapes can have several different soil types. Test several areas of your landscape.
Step 3. Right Plant, Right Place: Proper Plant Selection
Now that you have a master plan with ideas for planting areas, plant size, and plant shape, use what you have learned from analyzing your soil to make good plant choices for your design. When choosing the right plants, consider the following:
- Site conditions, such as sun exposure, light intensity, wind conditions, drainage patterns, and soil pH
- Functional use of the plant
- Mature size and form of the plant
- Growth rate of the plant
- Plant color and texture
Whether a plant is native to the area or not, if it is adapted to the soil, the climate and local site conditions, it will thrive.
Be strategic about planting areas. Use garden locations that are higher and drier for plants that prefer dry conditions. Flat or low areas that may retain moisture can be used for plants that prefer moist soils. Observe sunlight patterns in the landscape. Plant sun-loving plants where they get 6 to 8 hr of full sun. Plant partial shade plants where they will be shaded from the hot afternoon sun.
To reduce the need for irrigation, arrange plants in groups with similar needs. Use your master plan to layout irrigation zones and apply recommended amount of water where it is needed. Efficient watering will also reduce incidence of disease and environmental stress in your garden.
Planning Tips
- Group together plants with similar needs such as light, water, soil and nutrient requirements.
- Use your landscape’s natural topography to your advantage. Use garden locations that are higher and drier for plants that prefer dry conditions. Flat or low areas that may remain moist can be used for plants that prefer moist soils.
- Avoid rigid, formal, or geometric planting.
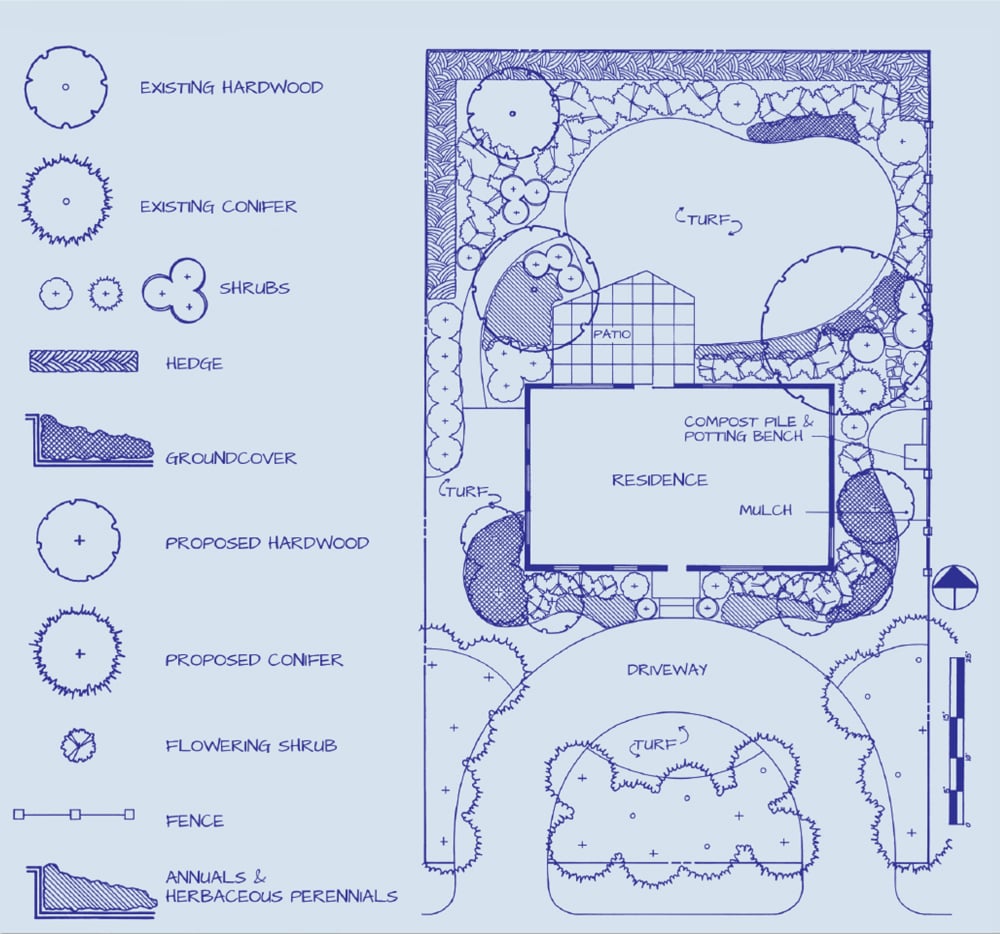
Existing landscapes can often become water-wise with a few modifications. Consider this example of a house bordered by a combination of foundation shrubs. Need for watering in this landscape is reduced by limiting frequent irrigation to a small area of annual color, exchanging irrigated turf areas for mulched areas around existing plants that do not receive additional water, and switching to a turf variety that requires less water in this site.
Existing Landscape (Before)
| Plants or Planting Area | Existing Water-Use Zones |
| Azaleas planted on the east side of the home where they get morning sun and afternoon shade | Occasional (irrigated as needed) |
| Pieris at the front door as an accent plant | Infrequent (little needed after establishment) |
| Abelia is used along the foundation on the north side of the home | Infrequent (little needed after establishment) |
| Dwarf Mugo pine along the front | Infrequent (little needed after establishment) |
| Little Gem Magnolia used to soften the corner | Infrequent (little needed after establishment) |
| A few existing trees on the north side of the property and a native oak in front | Infrequent (little needed after establishment) |
| Remainder of the landscape is turfgrass | Frequent (irrigated regularly to maintain optimum growth and beauty) |

Water-Wise Landscape (After)

| Plants or Planting Area | Action | New Water-Use Zones |
|---|---|---|
| Pieris at the front door as an accent plant | Plants left in place | Infrequent (little needed after establishment) |
| Azaleas planted on the east side of the home where they get morning sun and afternoon shade | Plants left in place | Occasional (irrigated as needed) |
| Abelia is used along the foundation on the north side of the home | Plants left in place | Infrequent (little needed after establishment) |
| Dwarf mugo pine along the front | Plants left in place | Infrequent (little needed after establishment) |
| Little Gem Magnolia used to soften the corner | Plants left in place | Infrequent (little needed after establishment) |
| A few existing trees on the north side of the property and a exisiting oak in front | Increase bed area by killing grass and covering area with mulch | Infrequent (little needed after establishment) |
| Colorful annuals | Concentrate annual color in small beds where soil has been amended | Frequent (water regularly) |
| Remainder of landscape is turfgrass | Reduce turfgrass area; replace remaining area with turf choice best suited for area | Occasional (irrigated as needed) |
Matching site conditions and plant material are key to wise water use in a landscape. By taking the time to map your site (step 1), learning about your soil (step 2), and researching the cultural requirements of the plants you want to use, efficient combinations can be made in the landscape that require less water.
UGA Extension Bulletin 625, “Landscape Plants for Georgia,” has additional cultural and growth information for many landscape plants.
Step 4. Grass With A Purpose: Practical Turfgrass Areas
Turfgrass is great for recreational areas of your landscape and can be an attractive accent to landscaped areas. Selecting appropriate turf species and cultivar for your site conditions and uses, combined with good establishments and maintenance practices, will help to create a lawn that requires less water.
Choosing an appropriate turfgrass variety for your site conditions and uses will also ensure a water-wise turf. There are several turfgrass options that will require less supplemental water when given correct conditions, including bermudagrass, centipedegrass, St. Augustinegrass, zoysiagrass, and tall fescue. For example, cultivars of St. Augustinegrass, tall fescue, or zoysiagrass may be suitable, water-wise choices for a turf area with trees and shrubs that receives 5 to 6 hr of filtered sun. Bermudagrass may be a better choice for a site with full sun and slight slope. While bermudagrass may be best for water conservation, there are also other species and cultivars that can handle these specific sites and conditions.
For best turfgrass performance, prepare the site well prior to seeding, sprigging, or sodding. Conduct a soil test and add organic material like compost according to Extension Services recommendations. To establish the turf, water frequently enough to prevent drying out. Wet the turfgrass root zone to a depth of 6 in. as needed. Do not saturate the soil or water so much that it runs off.
Once your lawn is established, adjust how much you water to the needs of the turf. Before watering, look for visual symptoms of water stress, such as gray color, leaf cupping/curling, or foot prints remaining on the lawn after you’ve walked across it. Pay attention to the weather. Reduce the amount you water when it is raining or cloudy. Avoid irrigation schedules that apply more water than the turf may need. Most turf needs an inch of water a week. When irrigating, wet the turfgrass root zone no more than 6 in. deep.
For more information, refer to UGA Extension Bulletin 733, Lawns in Georgia.
Turfgrass Tips
- During drought periods, a healthy turfgrass will wilt and turn brown, but then regain normal color and growth when it rains or environmental conditions become favorable for growth.
- Turf under water stress will appear a dull bluish green color, the leaf blades will roll inward, and footprints will remain on the grass after walking on it.
Step 5. Zone In on Your Watering Needs: Efficient Irrigation
The goal of a water-wise landscape is to minimize watering. We can do this by grouping plants into water-use zones depending upon how much water they might need, with each zone containing plants with similar water needs specific to site conditions, such as sun exposure, wind, and soil type.
After you have developed a water-wise landscape design plan, consider the plants and their needs before developing and installing the irrigation system. Use appropriate irrigation applicators for the plant materials so that the spray pattern covers the zone without wasting water. Program irrigation timers according to plant water needs within the zone. Use rain shut-off sensors, which are required by law on new systems, to avoid unnecessary irrigation when it rains.
Irrigate based on plant needs rather than a set schedule. Recognize the signs of plant water stress, such as wilting or abnormal gray-green foliage color, to water plants only when needed. Water between 4 p.m. and 10 a.m. to minimize evaporative water loss. Avoid wasting water and causing water to runoff by watering at a gentle and slow rate the soil can absorb. Following good gardening practices will decrease the amount of water that plants need to survive and thrive.
| Zone | Water Delivery Method | When Appropriate | Example |
| Frequent water application | Irrigation system on a programmable timer, delivering water on an as-needed basis, such as one to five times per week | During plant establishment, then on as-needed basis | Small ornamental plantings or turfgrass in highly visible areas that will give maximum visual impact |
| Occasional water application | Hand-held hose, soaker hoses, or irrigation system on as-needed basis, such as one or two times per month | During plant establishment When plants show signs of moisture stress | An established perennial border, one with well adapted plants; turfgrasses can be included |
| Infrequent water application | Rainfall | Not irrigated once they are established, except during extreme drought | Adaptive plants, such as juniper, crape myrtle, yaupon holly, and oak; and native, undisturbed areas |
UGA Extension Bulletin 625, Landscape Plants for Georgia, has additional cultural and growth information for many landscape plants.
Watering Tips
- Water plants before and after planting to reduce transplant shock.
- Regardless of your system, avoid watering during the hottest part of the day. It is best to water in the early morning and in the evening.
- Irrigate based on plant needs rather than a set schedule. Look for EPA WaterSense Labeled Irrigation Controller, which acts like a thermostat for your sprinkler system, telling it when to turn on and off, and use local weather and landscape conditions to tailor watering schedules to actual conditions on the site.
- Use appropriate irrigation applicators (e.g., microsprays, rotators, pop-up heads, drip) for the plants in a water-use zone that most efficiently cover the irrigated area.
- Drip irrigation systems use 30% to 50% less water than sprinklers and less water is lost due to evaporation.
- Water your turfgrass deeply and infrequently. This allows the roots to explore deeper soils for water and nutrients.
- UGA Cooperative Extension resource B 894, Lawn and Garden Irrigation Design, provides additional information about irrigation systems.
- Consider installing a rain barrel. Find a make-and-take workshop near you by emailing comments@northgeorgiawater.org.
- Install a rain gauge in your garden to monitor weekly rainfall. Adjust irrigation accordingly.
Step 6. Mulch Is a Gardener’s Best Friend: Use of Mulches
Mulching is one of the best things you can do for your landscape. Mulch serves as a protective layer for your soil, keeping water in and weeds and some diseases out.
Mulches:
- Conserve water by reducing evaporation from the soil surface.
- Help maintain an even soil moisture.
- Reduce crusting of the soil surface and allow water to penetrate easily to plant roots.
- Insulate roots from summer heat and winter cold.
- Discourage soil-borne diseases and weeds.
MulchinG Tip
- Placing newspaper under organic mulches improves the soil and water retention. It’s composting!
Easy Mulching Practices:
- Apply about 3 in. of mulch under plants in your landscape.
- Extend the mulched areas two to three times beyond the tree canopy spread. Pull mulch back 2–3 in. from the trunks of trees and shrubs.
Step 7. Let It Grow: Appropriate Maintenance
Now that you have a water-wise landscape, the last step is to let it grow.
Keep the landscape attractive without increasing the plants’ needs for water. Here are a few simple things to keep in mind:
- Test your soil every 2 to 3 years to monitor pH and nutrient levels and adjust as necessary.
- Avoid heavy pruning and shearing. Prune your plants with hand shears and loppers to thin branches more naturally. It is less stressful on the plant.
- Mow your turfgrass often so that no more than one third of the leaf length is cut at one time. Cutting your grass too short slows root growth and makes it more susceptible to heat and drought.
- Nitrogen promotes water-demanding new growth. Fertilize less and use a fertilizer that contains nitrogen in slow-release form, such as sulfur-coated urea, urea formaldehyde, IBDU (isobutylene-diurea), methylene urea, or an organic fertilizer product.
- Aerating turfgrass improves water movement and is sometimes needed to relieve soil compaction. Indicators of soil compaction include thatch build-up, excessive weed growth, and poor turf establishment (failure to thrive).
| Turfgrass | Inches |
|---|---|
| Centipede | 1 to 1.5 |
| Common Bermuda | 1 to 2 |
| Hybrid Bermuda | 0.5 to 1.5 |
| Tall Fescue | 2 to 3 |
| St. Augustine | 2 to 3 |
| Zoysia | 0.5 to 1.5 |
Portions of this publication were adapted from UGA Extension publication B 1073-1 Developing a Water Smart Landscape by Gary Wade and reprinted with permission from UGA Cooperative Extension.
Contributions came from Kostoula Vallianos, Metropolitan North Georgia Water Planning District; Sheri Dorn, University of Georgia Department of Horticulture; Bodie Pennisi, University of Georgia Department of Horticulture; and Clint Waltz, University of Georgia Department of Crop and Soil Sciences.
Visit the My Drop Counts website for more information on water resources in North Georgia.